One Piece of 6×6 Patterned Paper, Three Ways: Catherine Pooler and Ellen Hutson Blog Hop

Hi Friends and Welcome to the Pops of Paper Blog! The EH Ambassadors are hopping along sharing inspiration from the Catherine Pooler New Release. This release is so much fun and I have to say it took me back to my rainbow-loving, puffy sticker collecting, roller-skating days! 

You can find all the hop giveaway details and all the links for the entire hop at the end of this post.

Today, I thought it would be fun to stretch a 6×6 pattern paper. I’m a pattern paper hoarder so getting the most out of one sheet is a huge deal for me and Catherine Pooler has some amazing rainbow designs in the Totally Rad Paper Pack that I know I will be using again and again. My favorite out of the collection was the bright and chunky rainbow stripe paper.

I was able to use the one sheet of rainbow stripe paper three different ways (four times) on two cards. 

  1. Rectangle Rainbow borders around the sentiments on both cards using the awesome EBE Essentials Rectangles
  2. A thin side-panel background on the Happy Birthday Card.
  3. The rainbow stripe background on the Let the Good Times Roll! card. 

And…I still have a few rectangle pieces of the ONE 6×6 pattern paper left! Paper Hoarders…this is a proud victorious moment–LOL!
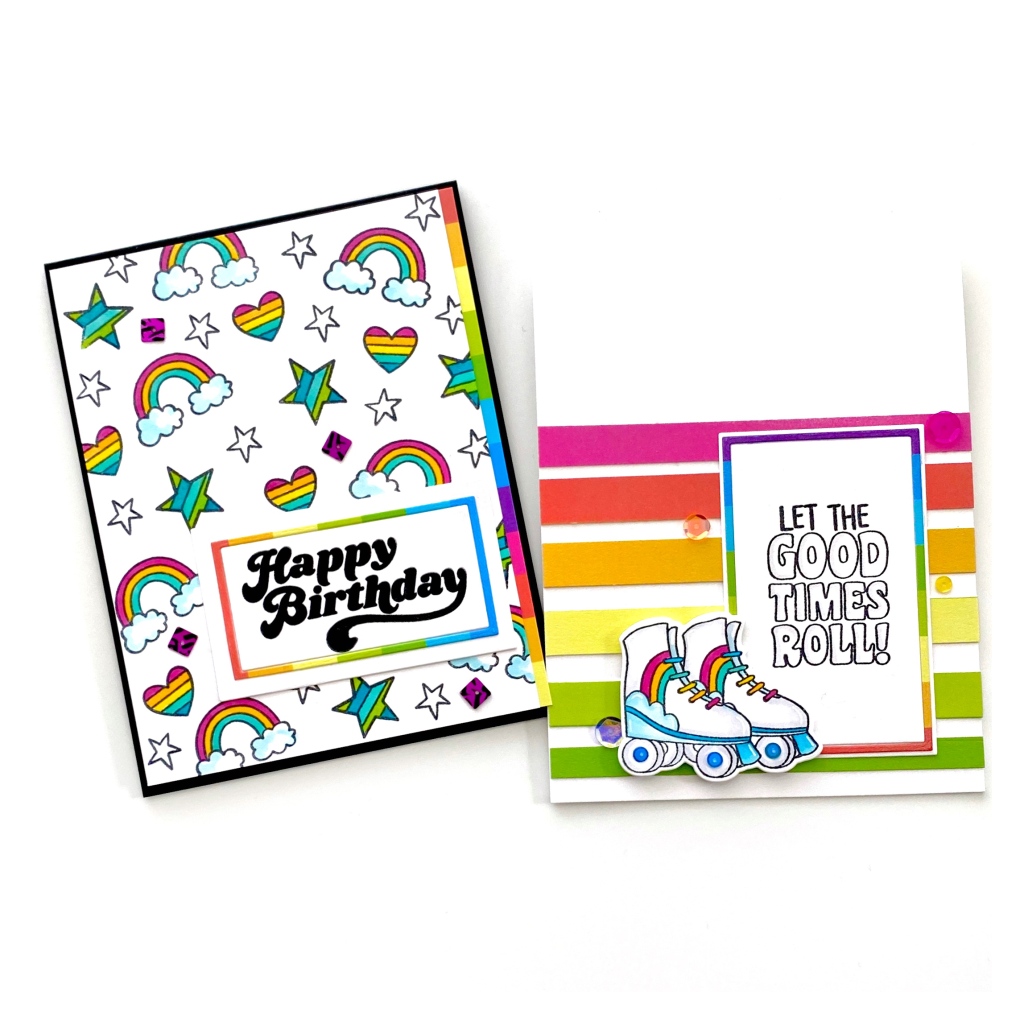
Happy Birthday! 

one of my favorite things to do when I receive a stamp set, is to find all the “littles” and create my own background pattern. The rainbow, stars and heart images are perfect together! For a little from the top I used the following Copic Colors to create my colorful rainbows: RV17, Y08, YR17, BG01, BG05, BG13, B00, B0000, C0, C1.

To create stamped pattern backgrounds, I find this method to work best for me:

  1. From the top of the card panel I stamp the largest image first across the card panel in a triangular pattern.
  2. Then the medium images are added using the same triangular approach. 
  3. Then I fill in the small gaps with the smallest image that I can find. 
  4. For the little extra spaces, I will add sequins, drops or other extra bling to even the design out. In this case, I used the rad pink and black zebra print sequins from Paisley Park. I mean come on…pink and black zebra square sequins…how TOTALLY RAD!! 

Let the Good Times Roll!

I am so happy with how this card turned out…it’s already pinned to my inspiration board to remind me that sometimes you gotta lace up your rainbow roller skates roll with it!

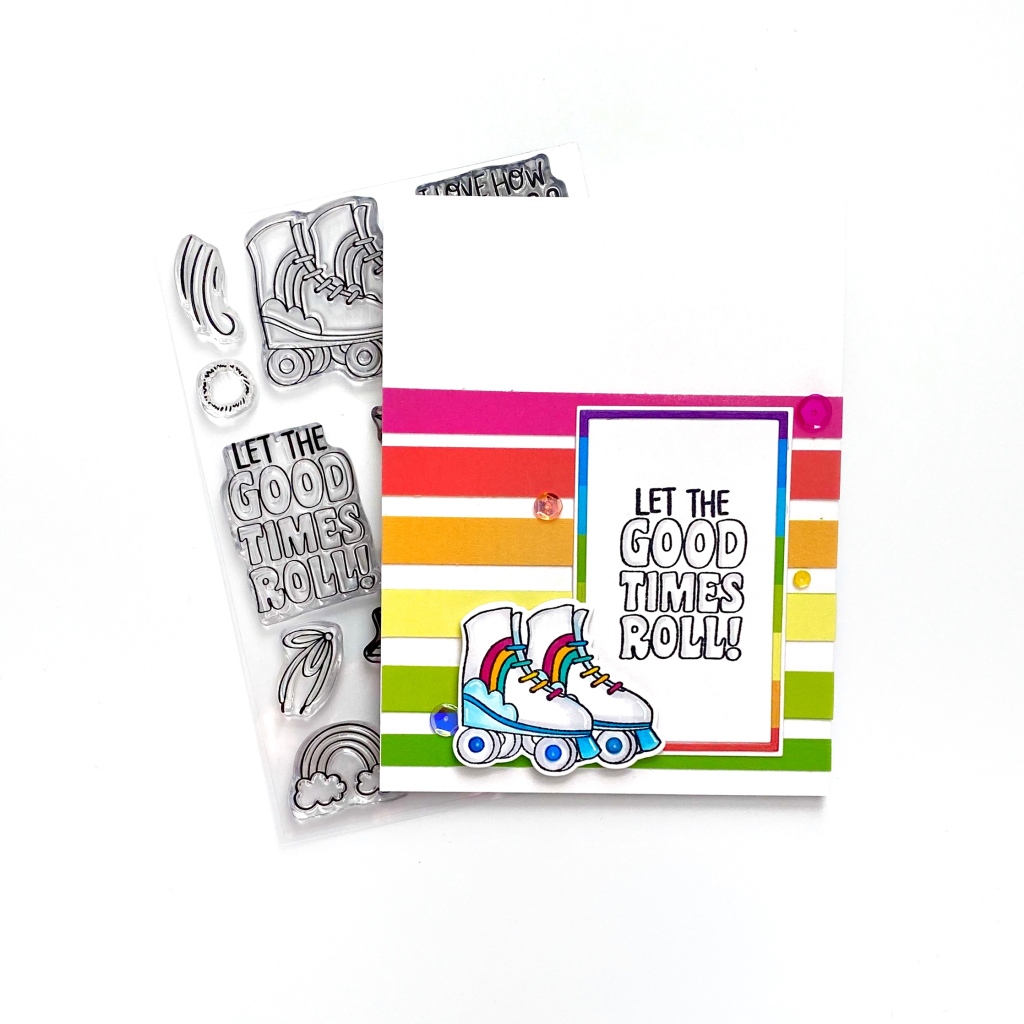
To create my card, I used my paper trimmer to create the individual rainbow stripes. I adhered them to my card about ¼ inches apart to let in a little white space. Then I colored the Roller Skates with Copic Markers and added the little blue circle sequins to the center of the wheels. I adhered the rainbow border sentiment and skates with thin foam adhesive squares. For a little extra pop, I added rainbow colored sequins from the Paisley Park Sequin Mix. 

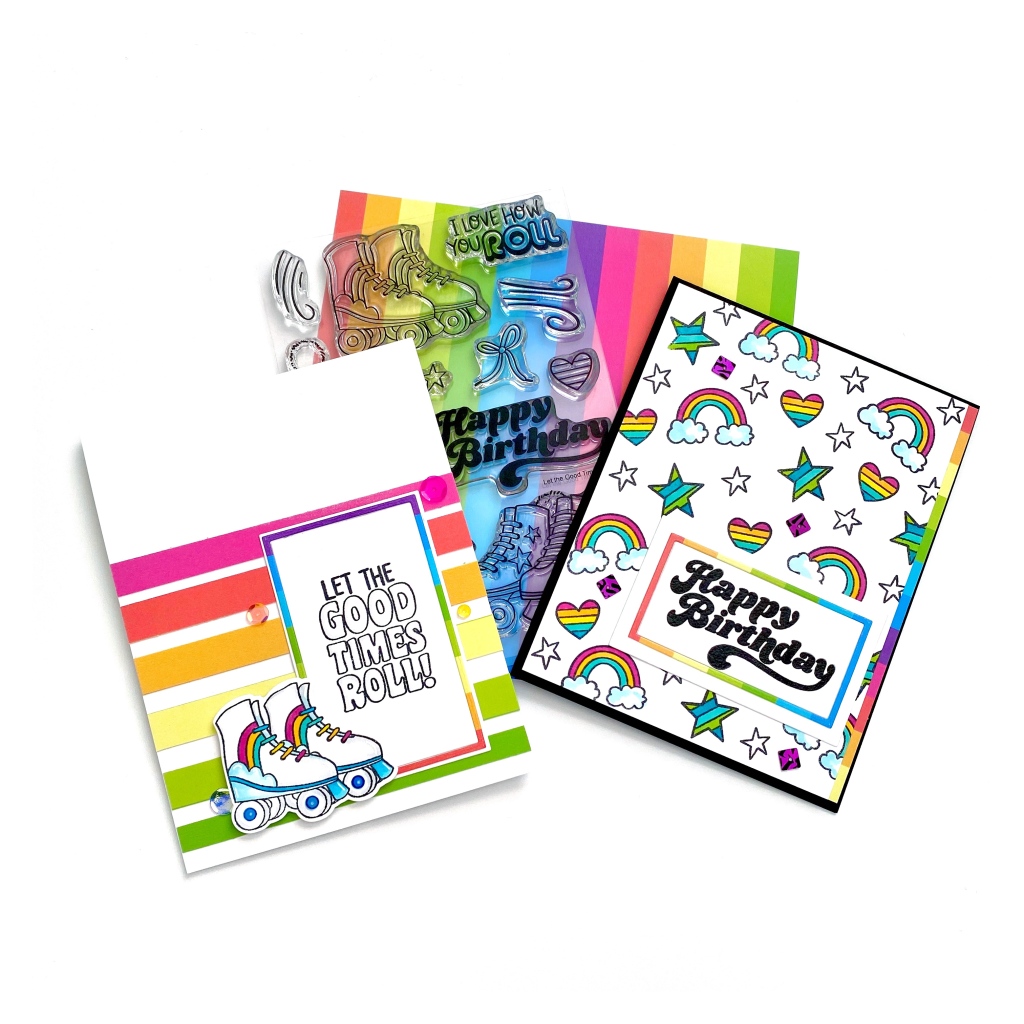
So there we are friends, two cards using only one piece of 6×6 pattern paper. I hope you enjoyed my cards today and it inspires you to stretch your supplies in fun new ways!

Big Paper Hugs!
Emily

Supply List

BLOG HOP INFO

One random & lucky commenter will win $25 to the EH shop! To enter for a chance to win, make sure to leave comments at each stop along the hop! Comment before Sunday, March 29th at 11:59pm PDT. Winner will be notified by email.

The Blog Hop:

Ashlea Cornell 

Emily Mydlowski (You are Here) 

Adelina Starace 

Michele Ferguson 

Kelly Griglione  

Laurel Beard 

Ardyth Percy-Robb 

Carly Tee Minner 

Julie Ebersole 

Therese Calvird 

Lisa Spangler 

Pretty Pink Posh March Release Blog Hop!

Hi Friends! Welcome to Pops of Paper! I hope you’re enjoying all the Pretty Pink Posh New Release Blog Hop Inspiration from the Ellen Hutson Ambassadors. The new Pretty Pink Posh release is all about spring; from tulips and daffodils, hedgehogs and bunnies and the sweetest little baby stamps and dies. Today, I’m sharing three (2 cards and a tag) Yellow-Inspired Springtime projects using the Spring Days Set and Hedgehog Friends Stamps and Coordinating Die.

Yellow is my go-to color for bright and cheerful cards and what better way to share a little sunshine than yellow daffodils with pops of pink and purple tulips! The Spring Days Stamp Set has you covered with a border full of daffodils along with a square daffodil floral image perfect for tags and clean and simple card designs.

I stamped and inked all of my projects with VersaFine Clair Nocturne Ink, Heat Embossed the images with WoW Clear Embossing Powder and colored with Zig Clean Color Real Brush Markers. I used a combination of the following colors for the flowers: Yellow-050, Lemon Yellow-051, Bright Yellow-052, Pale Yellow-055, Green-040, Emerald Green-048, Dark Pink-027, Lilac-083.

Love you Bunches

When I saw the cute little hedgehog critter holding the flower, I new I wanted her to be standing in a field of springtime blossoms with the Love You Bunches sentiment.

For the Love You Bunches card, I colored two daffodil borders and fussy cut. Then I colored and die cut the cute little hedgehog and butterfly images. Then I stacked the images using tape runner and different thicknesses of foam adhesive.

A little tip/trick: To keep my die cut layers “flat/even” but with dimensional pop, I use a thin foam adhesive for anything that is attached to another die cut piece and a thicker foam adhesive for the parts of the die cut that are adhered to the card panel (with no die cut piece). The different heights in foam adhesive provide even dimensional die cuts. This is how I adhered the Hedgehog to the card panel.

Hello Friend

For the Hello Friend card, I colored two daffodil borders and fussy cut and then adhered to a white card panel to create a portrait version of the love you bunches. Then I die cut the Hello Friend sentiment several times from yellow card stock and stacked them together with adhesive to give the sentiment a little dimension off the card panel. I thought the yellow card stock lettering looked too plain against the bright daffodils and tulips, so I used my Y15 and Y17 Copic Markers to create a shaded effect on the script sentiment. For a little extra pop, I added the darling sparkling clear flower sequins.

Daffodil Tag

For my third project, I created a cute little tag that I can’t wait to tie around a fresh bundle of springtime flowers from my garden…I am so wishing for winter to be over…as I write this I’m watching snow fall on the first day of Spring.

I colored the daffodil image and cut into a square using my paper trimmer. Then I die cut the Scallop Tag and created an aqua card stock border that fit within the scallop trip but just enough peeking through behind the daffodil images. I used my crop-a-dile to creat the little hole for the tag and then added some cheerful yellow twine.

Thank you For Stopping By!

So there we are friends. Three Yellow-Themed Spring Inspired projects using goodies from the Pretty Pink Posh New Release. I hope you enjoyed my projects today and it inspires you to break out your yellow crayons, markers and paints.

Blog Hop Details

Be sure to hop along for more inspiration and don’t forget to comment at all the stops for a chance to win a prize!

Hop Giveaway info…
One random & lucky commenter will win $25 to the EH shop! To enter for a chance to win, make sure to leave comments at each stop along the hop! Comment before Wednesday, March 25th at 11:59pm PDT. Winner will be notified by email.

The Blog Hop List of Inspiration

Julie Ebersole 

Adelina Starace 

Carolyn Peeler 

Michele Ferguson 

Ardyth Percy-Robb 

Emily Mydlowski (You are here)

Kelly Griglione  

Ashlea Cornell

Carly Tee Minner 

Sandy Allnock 

Below are affiliate links (at no additional cost to you) to a few of the supplies I used to create today’s projects. Thank you so much for your support!!